
One of the best ways anybody can enjoy music is by listening to songs on speakers, and every speaker you purchase from the market comes with its unique features and characteristics. There are speakers that are designed to be connected and wired in the same way, while some speakers designed to have cables can be overwhelming to work with. How to wire speakers with 4 terminals is what this post is here to talk to you about today, so keep reading.
If you are looking for best way on how to wire speakers with 4 terminals then this is the right page for you to be on, because there are so many questions on the internet asking for answers on how to wire speakers to multiple terminals. It can be very confusing if you have to wire a speaker to about 4 terminals, but trust this article to present you with an easy way out. Most speakers are designed to come with about two set of terminals which is the usual.
The two terminals that is common in almost every speaker will provide you with enhanced speaker quality and a great sounding experience, but the option of multiple terminals means the speaker is bi-amped. If you are just hearing the word bi-amp for the first time then i know you must be confused regarding what it really means. Well, you do not have to be worried anymore as the next lines in this article will be explaining what bi-amp means.
Content Navigation
What Is Bi-Amping?
Bi-amping refers to understanding the steps involved in wiring a speaker with four terminals, and this method is done through the separation of low frequency and high frequency speakers via their amplification channels. Bi-amplifying comes with four terminals instead of two terminals, and all of these terminals are responsible for providing accurate control and production of good sounds.
This is why so many people are of the opinion that bi-amping is best suited for home theaters, because it produces a different kind of sound you hear from your everyday speakers. Sound quality will be massively improved the moment a speaker gets bi-amped, and this can make listening to music or watching movies very interesting. If the sound being produced sounds demanding then it means the power a speaker receives can produce better and less constrained sounds.
How To Wire Speakers With 4 Terminals
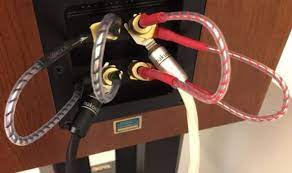
You can also decide to purchase several amplifiers and use with the speaker if the terminal is up to four, and we will not forget to mention that bi-wiring and bi-amplifying are similar. The difference between both methods is both sets of terminals have to be power amped, and the number of terminals between the two is different. Unlike bi-amping, bi-wiring has to do with only two speaker terminals.
Setting of terminals you have to wire into is required for bi-amplifying, and this is one of the easiest ways to produce quality and better sounds. If i tell you knowing how to wire a speaker to four terminals is an easy thing to do then you have to believe it, but what matters most is understanding the right cable to make use of during setup and understanding how wiring works. Bi-amplifying is necessary if you want to obtain quality and better sounds.
This post is here to show you all you need to know and the steps involved. Let us take a look at the steps involved in wiring a speaker to four terminals below.
How To Wire A Speaker With Four Terminals
If you ended up purchasing a speaker with four terminals, below are key steps to take when you want to wire the speaker to these terminals.
Step One – Ensure the entire speaker system is powered off
Step Two – Make sure every bi-wire bridges is removed from the speaker. This is also the point where HPF and LPF crossovers are disconnected.
Step Three – Make sure every amplifier is properly connected to the right speaker to ensure the receiver is configured to receive bi-amping setting.
Step Four – Locate the terminals behind the receiver that is designed for the purpose of bi-amping
Step Five – The amplifier level of controls should be set, and this is crucial if you want the signal provided to the speaker to have the same volume level.
Step Six – You can go ahead and set all amplifiers to have same level controls if the amplifiers are identical
Step Seven – The receiver’s main speaker should be connected to left speaker’s output set of connections.
Step Eight – Repeat same procedure on other sides, and this is the last step you have to take.
Today today has made it possible for speakers to come with about four terminals that makes it possible for you to send signals to separate amplifiers and drivers, making it easy for you to work with your speakers the old fashioned way. This means sending out signals to all the drivers connected to the speaker, and this connection is a pretty straightforward process. Though some methods might be different, but the steps we have showed you works.
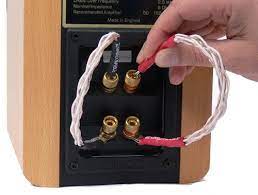
Identifying wire length and gauge is one of the first things you need to do when wiring speaker to four terminals, but knowing the right wire gauge and length to use depends your speakers impedance. Resistance in the wire will increase if you end up making use of a wire that is too long or too thin, and this could lead to audio degradation. Fifteen feet might be the ideal length of wire you need, and this is because a fifteen feet wire has about 4 ohms.
The speaker gauge that is required for connecting a speaker to four terminals is an 18 gauge wire, and making use of a wire made from copper is the right wire for you to use. Stripping both ends of the wire is the next thing you have to do so you can be able to place the wire at the bi-wire posts so they can be connected to the amplifier. Take note not to break or wreck part of the wire when trying to break wire insulation.
You can make use of a crimping tool to strip different wire gauges.
Interesting Read
Headset Mic Not Working On Windows 10
How To Use Headset Mic On PC With One Jack